Dots n' Spots


I had a bunch of Q-Tips left over from doing Primary Pointillism with my grade 2's, so I did this project with my grade 4/5's. It is an easy 1 hour class project, and you can talk about many things, including color contrast, shape, movement and rhythm. So depending where you are in your curriculum, there are quite a few Principles of Design that this project covers.

You will need:
  • - Sheets of black 8 1/2 x 11 construction paper
  • - Assortment of tempera paints
  • - Dixie cups (about 6-8 per group)
  • - Q-Tips (about 6-8 per group)
If I ever had my students sharing supplies, I moved them into groups of 4 or 5. The paints should be in the middle with a q-tip in each cup. Each student should have a piece of black construction paper.

I had my own piece of black construction paper taped to the board as well as an example painting I had done. I asked the students about "contrast". What does it mean? What are contrasting colors? (colors that are opposite from each other on the color wheel, and light/dark combinations). I had a color wheel on the board for the students to reference as well.

I told the students we would be making circles with dots. The color of the dots they chose had to be "contrasting" colors. This could either be opposite colors on the color wheel or a light/dark combination. They also had to make sure when picking their colors, that circles with the same colors don't touch each other.

I began by showing the students on the board how to begin their paintings. Choose a color and make a dot with q-tip paintbrush somewhere on your paper. Then choose a contrasting color and make dots all around this dot. Dots shouldn't be too far apart or two close together; you want the black of the paper to show through, but you also don't want huge gaps in between.

Keep going and alternating between colors for each circle of dots, until you have a medium sized circle. About 7-8 circles all together. If the circles start to go off the page, just let it happen.


Choose a new spot on the paper, and make a dot of a new color. Choose another contrasting color and continue to make circles like you did the first time. By this time, the students should be working on their own paintings. They don't need to follow along anymore, they just need the beginning demo.

Continue to pick new contrasting colors and make concentric circles with dots.


You'll notice that once a circle gets so big that you are running out of room, you just keep going as if the dots are disappearing behind the other circles. You don't want any black space left on the painting when you are done.


When students start to get to the end, I would stop them to show them how to finish the painting off. When you just have a few black spaces in the corners, just continue to make a dot and then put concentric circles around it. You want it to look like it disappears behind the other circles. You also don't want to choose colors that are the same as the circles beside it.


Here is a actual finished painting.


They look so beautiful when you hang them in the hallway...the colors just pop!

Architectural Drawing

A High School project I had my students do was an interesting Architectural Drawing.

I gave the upcoming project to them on Thursday so they had all weekend to prepare. Their job was to take pictures or find pictures of interesting architecture, and bring them to class on Monday. From here you can take it in two directions:

Option #1: The students create an architectural drawing with the pictures as reference points. I stipulated that it had to be a strange combination of architecture...no regular ol' buildings please.

Sorry the picture isn't very good quality. Bad lighting.


Option #2: Have the students incorporate the photo's into the drawing (collage).

Just to show you there are photo's here:

This one is very M.C. Escher-ish:

*Last three drawings are my own. While this is a project I did with my high school students, I didn't take pictures of all of them. The first one is the only high school example I have.

Computer Color Theory

This is actually not so much an art project, but a way of incorporating technology into your lessons. I had been doing a color theory unit with my grade 2's and that week for our computer time, I decided we would play around in KidPix* and teach the students about more color theory.

(*If you don't have KidPix, Paint also works)

Whether you are in KidPix or Paint, all students should be following along with you. I was lucky and had my computer screen projected on a big screen for all the students to follow along. Adjust your lesson plan according to the technology you have available to you. The students were following along and everyone should have a tool for making solid rectangles selected.

We began with making a red square. I then asked the students what the complimentary color of red was? (Green) We then drew a green square in the middle of the red square.


I told the students that complimentary colors like each other so much, that they tend to vibrate when they are next to each other. I told the students to test out my theory by staring at their square....are their eyes going funny? We then made the inverse of the red/green square right below it.


Does the green/red square do something different to your eyes than the red/green square?

We then continued and made all the other complimentary squares - yellow/purple and blue/orange.


From there, we saved these into the students folders, but you could print them off and put them in the students portfolios.

Next we moved on to talking about MONOCHROMATIC. I told the students that monochromatic means a drawing or a painting is done in all the same color - just different lightness and darkness of that color.

I then very quickly drew a picture in paint using monochromatic colors to demonstrate.


I then gave the students some free time to draw their own monochromatic painting. It didn't have to be an actual picture, it could be just abstract shapes. My only stipulation was that they choose ONE color and then use all different shades of that color to make the painting.


The students liked having free time to play around in KidPix or Paint. They came up with beautiful monochromatic abstract drawings. We saved them to the students folders, but you could also print them off and put them in their art portfolios.

These are just simple ideas, but a great way to teach your elementary students about color theory as well as incorporating technology.

Camouflage Hands


At a school I was teaching at, I had been teaching Grade 2's for about a month or so when I was also given a grade 4/5 split class to teach art to. I had many idea's of projects to start with, but the one that stuck out to me was this one. I knew I would be taking a risk with it, since I had no idea how this group of kids operated and how they would react to it, but I also figured it was a project to catch their attention right off the bat. I'm glad it ended up being the former!

*This is a great project to adapt to Junior High, and also to include technology since the work of art in end is a digital photograph. You could take this project one step further, and have the students alter the images in a computer program.

A few days before you are about to do the project, you need to tell the students to go to the library, or go home and research on their computer, to find pictures of plants or animal patterns close up. They all looked at me like I was crazy, so I gave them suggestions like a zebra's stripes, cheetah's spots, the veins of a leaf, etc. The grade 4's were doing a science unit on plants and photosynthesis, so this is a good art project to coincide with that.

Materials you should have ready to start:
  • - 11x17 white paper for each student
  • - various colors of tempera paint for each group of students
  • - paintbrushes for each student
  • - buckets of water for each group
  • - digital camera
  • - newspaper
We moved the students desks into groups of 4 so it was easier to share paints and put down newspapers on the desks. I also assumed some students were going to forget a picture of a pattern in nature, so I had a bunch of pictures ready. Students are to begin drawing out their pattern in pencil on their large sheet of white paper. They had to raise their hand and have me approve it to move on to painting. Once they were painting, they had to paint the ENTIRE sheet of paper right to the edges leaving no white spaces. This whole process took about a 1 hour class, and I stopped at this point because you need the students patterns to be dry. Some students weren't finished painting, so I had them come in at noon the next day, so they were caught up to everyone by the time we started the next class.

The next class is the fun one!! The students begin with their painted animal/plant pattern on the desk in front of them. They then place their left hand (non-dominant hand) on the pattern. I came around and approved the placement, because I wanted it to be complicated enough for the students to actually have something to paint. Once their placement was approved, it's time to begin painting! Students are to paint the pattern on to their hand with tempera paint....the pattern should continue exactly how it would be underneath the hand. The end goal is to camouflage it, so we can't tell where the hand is. The students LOVE this part!

When the students are done painting the pattern on their hand, they had to raise their hand (not the one that has been painted!) and wait for me to get to them. The work of art will be a digital photo of their camouflaged hand, so I came around and took a picture of them.

This is such a fun project for the kids. They love being able to paint on their hands and not get in trouble for it. I had students who told me they hated art on the first day, and it was a really tough go getting them to even draw and paint the pattern in the first place. By the 2nd class when they got to paint on their hand, they were excited from then on to come into my art class! One kid who was a self-proclaimed art hater, later told me it was now his favorite class! Go-figure.

I took all the photo's to Staples and had them printed on 8x10 in color. We hung them in the hall, and other students from other classes were jealous and asking the grade 4/5's if they really got to paint on their hands?! Parents loved these also, and I had a few tell me they were going to frame the art. Here are the beautiful finished results:


Cubist Music

Alright...onto some High School stuff.

I LOVE Cubism, and have explored it within my own art extensively. I introduced this project to grade 11 and 12's, so they too could explore Cubism. I began by showing the work of Pablo Picasso.

Girl with a Mandolin


The Accordionist


Ma Jolie (Woman with a Guitar)

We looked at how he broke up the plane with facets of light and shadow and color. We also noticed that music was a theme to a lot of pieces.

I set up a still life with a guitar and other instruments. Students were to use multi-media: pastels, pencil crayon, graphite, charcoal, etc., as well as a collage element. They could use any combination of media as long as they used 2-3 mediums and collage. We brainstormed collage elements, and some included music sheets, newspaper, guitar strings, etc.

Armed with a pencil and a ruler, students sat around the still life to get a good composition. From there they decided the mediums they wanted to work in and worked independently and the results were great.


These are some cubist drawings of my own, that I also showed my students:


Showing students your work may or may not be a good idea. Depending on the group of students it might really inspire them....or it may make them think more limited, and just make the kind of art you have shown them.

Edible Color Wheel

Are you ready for my all-time favorite art project ever?! I promise you your young elementary school kids will love you forever. What could be better than having fun while learning, making art and then eating your art project afterwards? 'Nuff said.


This project, while ridiculously fun for the kids, really needs planning and forethought on your part for things to move along smoothly. It's okay....I gotcha covered. It will take approximately 1 1/2 hours. I did it at the end of the day, so the last few minutes of class before the kids went home were spent munching on their creation.

You are going to want to purchase these:
  • - dixie cups
  • - fat popsicle sticks
  • - a box of arrowroot cookies
  • - 2 packages of food coloring
  • - Approximately 3-4 containers of vanilla icing (I used "whipped" and it worked well)
  • - small styrofoam plates
  • - A color wheel-cookie mat for each group
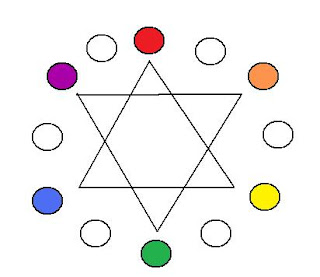
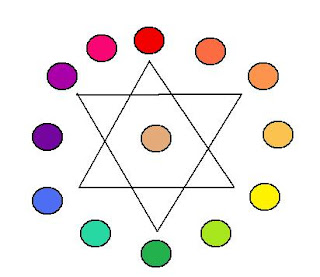
This is what the color wheel-cookie mat looks like, and you can whip it up on the computer in Paint in about 3 minutes:


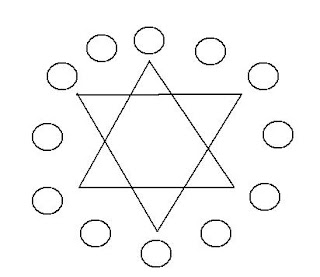
Just print them off on 11x17 paper.

Choose partners for your kids beforehand. I did this project with 25 grade 2's and I didn't want fighting or whining or anything...just fun! So I wrote down a list of kids I thought would work well together in partners. I also needed to put these partners in a group....so decide which groups of two can become a successful group of 4.

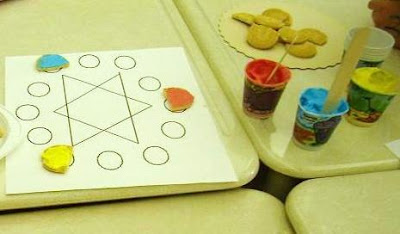
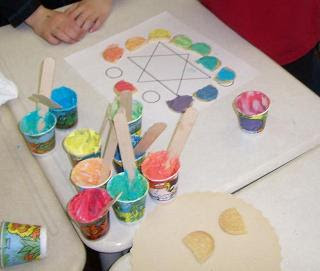
I then took 3 dixie cups for each group, and placed a substantial amount of white icing in the cup...I think I basically filled it up. They need enough icing to ice their cookies as well as mix to make other colors and ice those cookies. Take your food coloring and turn the white globs of icing into red, blue and yellow. Use quite a bit of coloring so you have true vibrant colors (not pink, instead of red). Place a popsicle stick in each cup. I had already arranged the desks into groups of 4, so while the kids are out of the classroom (recess, gym, or lunch...you'll definitely need set up time) place a red, blue and yellow cup of icing into the middle of each group. Also place 10 dixie cups and 10 popsicle sticks in the middle as well. Take the arrowroot cookies, which should be shaped like ovals, and break them in half. Place 26 cookies on a paper plate and set that in the middle of the group as well (you could also make this easier and just buy vanilla wafers which are already round....the arrowroots are cheaper though). I covered this up, so once the kids got back in from recess they weren't tempted to stick their fingers in and start playing with it. I also wrote "DO NOT TOUCH ANYTHING ON YOUR DESKS" on the board, so when they came in they knew the rules.

The kids came into the classroom with excitement and anticipation as to what could possibly be happening during our art class. They respected the rule on the board and no one touched anything.

I moved the kids into their partners and groups, so that everything was ready to go. Each set of partners needs a color wheel-cookie mat. The partners are working together to complete the color wheel, but sharing icing as a group.

Now for the instructions and rules. I explained that we were going to learn about the color wheel and what colors mixed together to make other colors. Every time we mix a color together, we are going to spread icing on a cookie (*the kids faces lit up!)

THE GROUND RULES ARE:
  • No eating until the very end. (I explained that if they ate a cookie then they wouldn't have enough to finish the project, and that I would be taking a picture of the completed wheel at the end so they needed all iced cookies present!)

  • No licking icing off your fingers. (This is meant to stop kids from dipping their fingers in and stealing icing. Their hands will get a little messy though, so if they licked to get rid of it I didn't mind. I was just trying to deter the icing stealers :)

  • You can only mix icing when I call your number (I'll get to that later).

  • You must take turns icing the cookies in your partners.
Once the kids understand the rules you are ready to proceed. Now for the number business...I wanted kids to take turns in an orderly fashion, and whenever I number kids off, inevitably I hear "I forget what number I am!" "She's going on 2 and her number is 4!!" To avoid this, I took a crayola washable marker and numbered everyone in the group 1 - 4 by writing the number on the back of their hand (They can't say they don't know what number they are!)

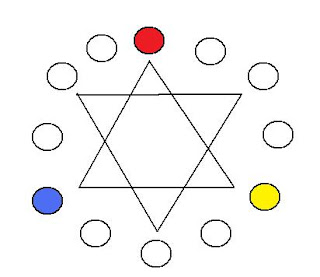
We are (finally) ready to begin! I asked if students knew the primary colors. Once the answers were offered I wrote it on the board. I told the students that one of the partners should take red and ice a cookie and place it at the top of the wheel. The other partner should ice a cookie yellow and place it at the bottom right hand corner of the triangle, and the person who iced red, should now ice a blue cookie and place it at the bottom left hand corner.


I had one of the paper color wheel-cookie mats taped to the board, and I was coloring in the appropriate circles with the appropriate colors to show the students where to place them. I continued to do this for the rest of the lesson.


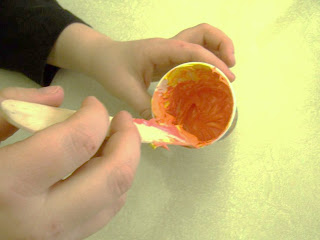
Now we are onto secondary colors. These are made by mixing two primary colors together. I asked the students if anybody knew what color we would get if we mixed together red and yellow? It was funny because I had one eager kid put up his hand and say excitedly "GREEN!" I told all the #1's to take a clean dixie cup and place a large dollop of red into their cup and the same amount of yellow into the cup and mix it together with a clean popsicle stick. Once they saw what color it was turning when they started mixing, I heard a few excited "it's turning orange!"


Have the partner who iced the yellow cookie (the partners should be alternating back and forth who are icing the cookies) ice this one and place it in between the yellow and red cookie. The #2's should take a clean cup and a large dollop of yellow and a large dollop of blue (I had the students continue to predict what color we would end up with) mix it together and ice a cookie and place it in between yellow and blue. Once this is done and placed on the mat, the #3's should do the same with red and blue, and place it in the appropriate spot on the mat.


*I should note that I didn't let any of the partners or groups get ahead. The whole class mixed up colors, iced the cookie, and placed it on the mat at the same time. We didn't move forward until all the groups were ready.

Now we are onto tertiary colors. These are made by mixing together one primary color and one secondary color. All The #4's need to mix the same amount of red and orange together in a clean cup with a clean popsicle stick. What is this color called? (red-orange). Ice a cookie and place it between red and orange. From here the colors obviously get pretty predictable about what color they turn into and what goes where. Here is the order in which they should be iced:
#1's - orange + yellow
#2's - green + yellow
#3's - blue + green
#4's - blue + purple
#1's - purple + red


Now for the very last cookie. The #2's are going to take a little bit of icing from all the colors and mix it together in the last clean cup. What color do you think we will end up with??

It ends up being a brownish cream or gray (depending on how much of each color the student mixes together). We call this a NEUTRAL color. Browns, creams, grays, etc. fit into the category. This cookie should be iced and goes in the middle of the color wheel.


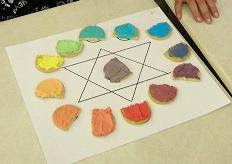
Now one last thing before the kids can dive in!! I went around to all the groups and took a picture of the partners and their completed color wheel. This is documentation and it's really cute to add the pictures to a class newsletter or add it to the students portfolio. Once the students pictures were taken they can split up their loot and enjoy the fruits of their labor. I swear the kids will be talking about this for weeks afterward!

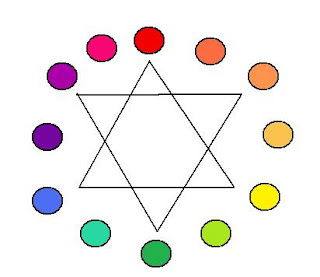
I won't post any pictures of my students faces, but here is a completed color wheel.