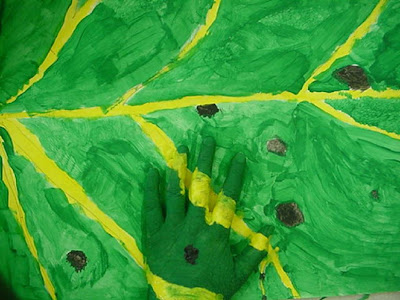
At a school I was teaching at, I had been teaching Grade 2's for about a month or so when I was also given a grade 4/5 split class to teach art to. I had many idea's of projects to start with, but the one that stuck out to me was this one. I knew I would be taking a risk with it, since I had no idea how this group of kids operated and how they would react to it, but I also figured it was a project to catch their attention right off the bat. I'm glad it ended up being the former!
*This is a great project to adapt to Junior High, and also to include technology since the work of art in end is a digital photograph. You could take this project one step further, and have the students alter the images in a computer program.
A few days before you are about to do the project, you need to tell the students to go to the library, or go home and research on their computer, to find pictures of plants or animal patterns close up. They all looked at me like I was crazy, so I gave them suggestions like a zebra's stripes, cheetah's spots, the veins of a leaf, etc. The grade 4's were doing a science unit on plants and photosynthesis, so this is a good art project to coincide with that.
Materials you should have ready to start:
- - 11x17 white paper for each student
- - various colors of tempera paint for each group of students
- - paintbrushes for each student
- - buckets of water for each group
- - digital camera
- - newspaper
The next class is the fun one!! The students begin with their painted animal/plant pattern on the desk in front of them. They then place their left hand (non-dominant hand) on the pattern. I came around and approved the placement, because I wanted it to be complicated enough for the students to actually have something to paint. Once their placement was approved, it's time to begin painting! Students are to paint the pattern on to their hand with tempera paint....the pattern should continue exactly how it would be underneath the hand. The end goal is to camouflage it, so we can't tell where the hand is. The students LOVE this part!
When the students are done painting the pattern on their hand, they had to raise their hand (not the one that has been painted!) and wait for me to get to them. The work of art will be a digital photo of their camouflaged hand, so I came around and took a picture of them.
This is such a fun project for the kids. They love being able to paint on their hands and not get in trouble for it. I had students who told me they hated art on the first day, and it was a really tough go getting them to even draw and paint the pattern in the first place. By the 2nd class when they got to paint on their hand, they were excited from then on to come into my art class! One kid who was a self-proclaimed art hater, later told me it was now his favorite class! Go-figure.
I took all the photo's to Staples and had them printed on 8x10 in color. We hung them in the hall, and other students from other classes were jealous and asking the grade 4/5's if they really got to paint on their hands?! Parents loved these also, and I had a few tell me they were going to frame the art. Here are the beautiful finished results:


6 comments:
This is an amazing idea! I'm teaching my third graders about camouflage in science and this will be an awesome tie in with it! Thanks for sharing!
This lesson made the Weekly Top Twenty best art lessons over at The Art Fairy. Come by and pick up your button if you get a chance. Great lesson!
I love this idea. It really was hard to find some of the hands at first!
These are really amazing! I love that the kids did such a careful job of matching the edges of their original designs. I agree that some you had to look at very carefully to see well. Thanks for sharing
Thank you so much for this great lesson plan I did this with my students and the results were great!
http://artsysoni.blogspot.com/2011/08/camouflage-hands.html
I'm the Editorial Assistant for Fun Family Crafts and I wanted to let you know that we have featured your project! You can see it here:
http://funfamilycrafts.com/camouflage-hands/
If you have other kid-friendly art ideas, we'd love it if you would submit them. If you would like to display a featured button on your site, you can grab one from the right side bar of your post above. Thanks for an awesome project idea!
Post a Comment